Now it appears that the latest release of ColorVision's PrintFIXPro profiling software will be able to make good neutral profiles for the UT-3D inkset. This inkset is the first carbon-based B&W inkset to have a full, though very small, "color space," and it now also becomes the first archival, carbon pigment insket to be able to take advantage of state-of-the-art, semi-automatic profiling software, including on the very affordable Epson R220. So, if you need a color profiling system for color printing, this one can also profile a dedicated B&W inkset. If you already have PrintFixPro, you can make good, neutral profiles for the 3D inkset for many different and new papers.
Althought the market is in transition, the Epson C88 and R220 remain the best values and, with third party B&W inksets from MIS, can make outstanding 8x10 inch (letter-size or A4) prints more simply and economically than any other approach. They are a great place to start. My 220 gets more use than any of my more expensive printers. While the 220 is becoming very hard to find, the R340 appears to print exactly the same as the 220.
The new Epson R260 and 1440 may be excellent printers for the future, but so far there are no third party cartridges and chips available for them. Thus it is too soon to buy these for B&W printing.
With respect to variable-tone inksets, I have two relatively new ones that I'm most excited about. First, the UT-3D inkset that now is supported by modern profiling software, and, second, a new "open source" inkset approach that uses mostly standard inks, including four MIS carbon inks, plus light cyan and magenta color pigments. This latter approach requires the use of a rip and is most highly recommended for large format printers, where ink tone stability has been a problem with the blended B&W inksets I've used in the past. It is also, however, an approach that can unify our workflows and inksets across printing platforms. The rip curves that control a 220 will, hopefully, be very close to those that can also control a 9600 with the 4K+ or 5K+cm approach or a k3 printer with the standard color OEM ink arrangment. That is, the goal is one basic inkset and workflow for most printers. For more information on the open source inkset, also known as the "4K+" and "5K+cm" inksets, click here.
For information and settings related to the MIS EZ inksets
click here.
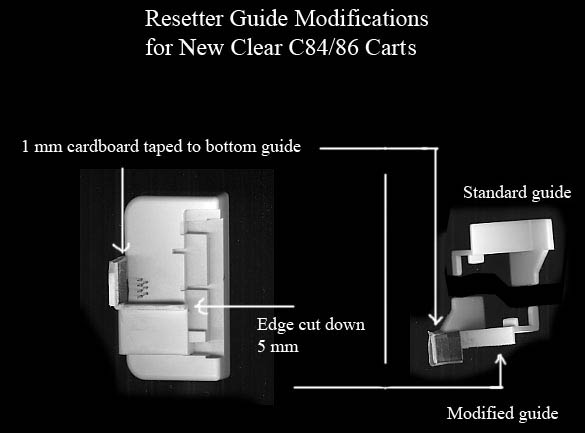
To see a picture of a modified MIS Chip resetter for the C86, see
this C86_Resetter_Guide.jpg image.
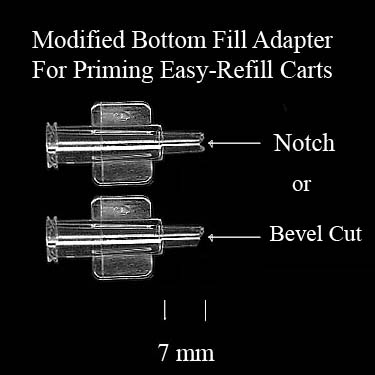
To see a picture of a modified (with a file) MIS Bottom Fill Adapter for priming, see
this image.
As with the R200, below, and the EZ C88-86 setup, the R220 with UT-R2 inks can print excellent B&W photos with no special software -- not even Photoshop. In addition to this easy approach, with the R220 I've used Roy Harrington's "Create ICC" program to make ICCs for printing on a number of popular papers. This allows Photoshop and Photoshop Elements, by using a color managment approach, to achieve easier print to monitor matching and consistent printing among different paper types.
This brings the state of the art to entry level B&W.
Comparing the C88 and R220, I favor the C88 for glossy papers and the R220 for matte papers.
For detailed information and settings related to the R220 and the UT-R2 inkset click here.
To download ICCs for selected papers, click here.
If there is no ICC for the paper you want to try, see the next section, below, on how to make a custom ICC with just a flatbed scanner.
The R220 uses the same physical carts as the C88 & C86 (but the chips and inks are different). As such, the links at the end of hte C88 section, above, may be useful.
While I've set up the R220 with R2 inks, note that most Epson hextone and better pritners can probably use the R2 inkset. If both warm and neutral/cool R2 inks are installed, these systems also become, de facto variable-tone printers.
This is an evolving project that may be able to bring the benefits of color management to most B&W printers who print from a grayscale file. I'm just focusing on the grayscale ramp, not the tones of the inks. As such, it's much simpler than full color profiling.
Elements 4 is a very nice image editor that has most of what a B&W printer needs at a very reasonable cost -- about $50 on eBay. I'll try to make my workflows consistent with Elements, using version 4 as the standard for testing. With some tips on working around its limitations, Elements users can, in fact, use all the inksets I've worked on.
For information and settings related to the MIS UT-R2 inkset on the R200
click here.
For a tutorial on making simple, grayscale curves to fine tune or "linearize" inksets in Photoshop,
including specifically the R200 and C86,
click here.
To download curves for the UT2 inkset in the 1280, 1290, and 890,
click here.
The 1270 will run the UT2 inkset if the 1280 driver is used. However, the quality of that
printer with glossy paper may not be up to the 1280.
To download curves for the UT7 inkset in the 2200,
click here.
For information and settings related to the Ultra Tone 7 inkset in the Epson 7600 printer,
click here.
To download curves for the UT7 inkset in the 7600,
click here.
For more curves related to the Ultra Tone 7 inkset in the Epson 7600 printer,
go to Bill Schwab's website by
clicking here.
For Epson 4000 UT7 curves go to Dirk Hobman's website by
clicking here.
Note that large format printers need to be used regularly in order to keep the blended inks in the
tubes between the cartridges and heads from separating. If the printer is not used regularly,
consider using the MIS Autoprint software.
For a file that shows the approximate tones of the UT7 inkset,
click here.
The quadtone versions of the UT-FS inksets for the 1160 and 3000 have been supported for some time. The curves can be downloaded from the MIS website.
Looking forward, the "EZ" approach that allows driver slider control of the inks will probably be the next step.
The R200 is the first to use a complete set of the hextone EZ monotone inks.
These inksets have a new light gray ink that is the same density as the UT2 and UT7 inksets.
These densities allow the printer to be controlled by the driver sliders.
The UT7500 -- what I call the 7500 FSN+, below -- is the first inkset to use the netural version of the new light ink.
UT2 LM and UT7 LC are the carbon version of the light ink.
Below, I have links to information relating to the older UT-FSN approach,
which usually needs a curve and not just the driver controls.
For information and settings for the 1280, which will probably also be valid for the 1290,
click here.
To download curves for the 1280 UT-FS monotone inkset,
click here.
For information and settings for the 1270,
click here.
To download curves for the 1270 UT-FS monotone inkset,
click here.
For information and settings for the 2000P,
click here.
To download curves for the 2000P UT-FS monotone inkset,
click here.
The goal with this inkset was to produce the best neutral-tone B&W prints on both matte and glossy paper -- without the need to change the black ink. It worked well as long as the printer was regularly used, making the 7500, as well as the 9500, 7000, and 9000 very flexible B&W printers.
Today, however, I recommend the 4K+ inkset approach.
Click here for information on the new approach I'm
using for large format and other printers.
For information and settings for the older UT-FSN+ inkset,
click here.
To download curves for the 7500 UT-FSN+ inkset,
click here.
I use the Purge pattern files to see what the ink colors and densities are that are loaded into my printer. Comparing purge patterns is a good way to see if the inks in your printer are what you expect.
To download 21-step and UT2 & 7 test files,
click here.
Perhaps the easiest way to match the monitor to the printer's characteristics is just to make a Photoshop curves adjustment layer. However, with these you have to remember to deactivate the layer before printing.
Another very useful method takes advantage of Photoshop's preview or "soft proofing"
capabilities. This system is excellent once set up, but the process requires that a
custom dot gain curve be made in Photoshop. The procedure, which must be followed
exactly, is spelled out in detail
here.
In initial fade testing of the highlights of this 4800 print as well as comparable dedicated B&W carbon pigment prints (UT7) the 4800 print appeared to fade significantly faster. This initial test could not determine if it was the amount of color ink in the 4800 print or the overall K3 inkset that was the cause of the faster initila fading.
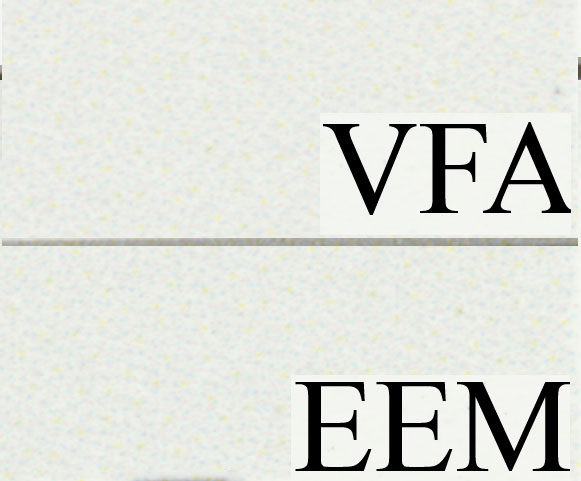
2. This scan shows 2400 ABW 5% prints on EEM. One with the EEM media type setting, and one with the
Velvet Fine Art setting. The amount of color ink used appears to be close. Click here
to see the Jpeg of the scan.
Other measures suggest that this filter pack adds about 2 stops of effective dynamic range by "partitioning" the scene's light range among the sensors. The combination of filters results in differing degrees of neutral density over the standard color-filtered pixels.
These filters (8 & 30) were just what I had on hand. Much more experimentation and calibration is needed for this approach. Of course, there may be negatives to the system. For example, the stronger the filtration, the more artifacts may appear. But, bottom line, there may be a way to capture much more range for B&W by using different filtration for different scene luminance ranges. Knowing the range of the scene and what filter may be needed reminds me of the need early B&W photographers had for knowing that range so that they could develop their film appropriately. Rather than "plus" and "minus" devilopment, we may end up with different "plus" filters that add to the range in differing amounts.
Ultra Tone B&W Inksets In General
Why Not Use a Standard Color Inkset?